


Flexify
Flexify is a plug-in filter for paint programs. It warps full-sphere photos -- those showing a full view of a scene in every direction -- into new shapes that are more attractive or useful.

To use this software, you need a paint program which accepts standard Photoshop 3.0 plugins.
Just put the plug-in filter into the folder where your paint program expects to find it. If you have Photoshop, the folder is Photoshop:Plugins:Filters or Photoshop:Plug-ins. You must restart Photoshop before it will notice the new plug-in. It will appear in the menus as Filters->Flaming Pear->Flexify.
Most other paint programs follow a similar scheme.
If you have Paint Shop Pro: you have to create a new folder, put
the plug-in filter into it, and then tell PSP to look there. In
PSP 5 or PSP 6: choose the menu File-> Preferences->General Program
Preferences... and choose the Plug-in Filters tab. In PSP 7: choose
the menu File-> Preferences->File Locations... and choose the
Plug-in Filters tab.
Use one of the "Browse" buttons to choose the folder mentioned
above.
From PSP's menus, choose the plugin. For example, choose Image->Plug-in
Filters->Flaming Pear->Flexify. If you have PSP 7, look in Effects->Plug-in
Filters->Flaming Pear->Flexify.
When you invoke Flexify, a dialog box will appear:
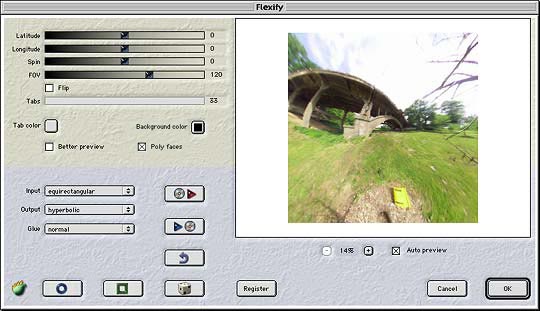
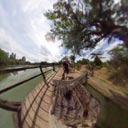
| To get a quick idea of what Flexify does, load a full-sphere panoramic
image into your paint program (there's a small example panorama
here). If the image is circular, the edge of the selection should
just graze the edge of the circle.
Invoke Flexify, and tell it what kind of input image you're using via the "Input" popup menu. Choose a different projection from the Output popup. Click the dice button a few times until you see a result you like; then click OK. Flexify's capabilites and controls are explained below. |
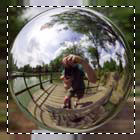
selection should graze edge of circle for mirror-ball, polar, and orthographic images |
| name |
remarks |
||||
| equirectangular a.k.a. cylindrical equidistant or plate carée |
The panorama fits into a rectangle. Meridians are vertical, parallels are horizontal, and the north and poles are stretched out to lines at the top and bottom. Scanning panoramic cameras produce this kind of image. |  |
|||
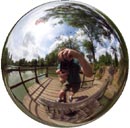
| mirror ball | The reflection seen in a mirrored ball |
|
|||
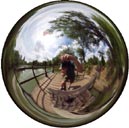
| polar a.k.a. azimuthal equidistant |
Angular distance from the center of projection increases uniformly toward the edge. |
|
|||
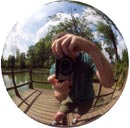
| orthographic | The image sphere as seen from the outside |
|
|||
| tetrahedron | An unfolded 4-faced shape | 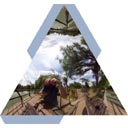 |
|||
| cube | An unfolded 6-faced shape |  |
|||
| octohedron | An unfolded 8-faced shape | 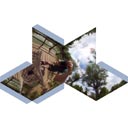 |
|||
| dodecahedron | An unfolded 12-faced shape | 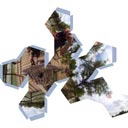 |
|||
| icosahedron | An unfolded 20-faced shape | 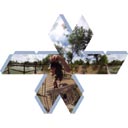 |
|||
| Hammer | A 2:1 wide ellipse | 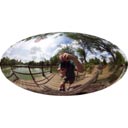 |
|||
| Werner | A heart-shaped projection |  |
|||
| sinusoidal a.k.a. Sanson-Flamsteed |
A pointy shape |  |
|||
| rectilinear a.k.a. gnomonic |
Like a regular view from a normal lens. Straight lines stay straight. The FOV slider controls the zoom, which can go all the way to a 180° field of view. | 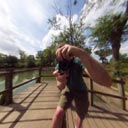 |
|||
| hyperbolic a.k.a. stereographic |
Produces views balancing naturalness with vertigo. The FOV slider controls the zoom, which can go all the way to a 360° field of view. |
|
|||
| cylindrical | This is the format needed for some panorama viewers, including QuickTime VR. The view is infinitely stretched toward the top and bottom, so the vertical view is determined by the rectangle's proportions. | 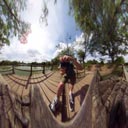 |
|||
| Wetch | An unusual projection with a finite height and infinite width. The FOV slider controls the zoom, which can go all the way to a 360° field of view. | 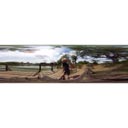 |
|||
| pinwheel | Polar with a swirl. | 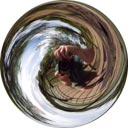 |
|||
| lozenge | A wide diamond shape with a crease at the equator. |  |
|||
| square | A square full of creases. Good for scenes containing lots of straight lines. |  |
|||
| curvy | Labrys-like shape with limited distortion. It's the central portion of a mirror ball projection. | 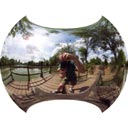 |
|||
| goggles | Goggle-shaped view which presents the whole sphere in a style like the hyperbolic projection, but with less extreme size changes. | 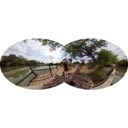 |
|||
| quasar | Weird projection with inside and outside regions bounded by a circular black-hole-like discontinuity. | 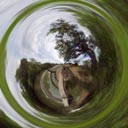 |
|||
| 14 faces | An unfolded cuboctahedron. |  |
|||
| 24 faces | An unfolded deltoidal icosatetrahedron. |  |
|||
| 26 faces | An unfolded small rhombicuboctahedron. |  |
|||
| 30 faces | An unfolded rhombic tricontahedron |  |
|||
| soccer ball | An unfolded truncated icosahedron. |  |
|||
| 32 faces | An unfolded icosidodecahedron. |  |
|||
| 38 faces | An unfolded snub cube. |  |
|||
| 60 faces | An unfolded deltoidal hexecontahedron. |  |
|||
| 62 faces |
An unfolded small rhombicosidodecahedron. |
 |

| The reset button sets latitude, longitude, and spin to zero. This gets you back
to the "normal" view.
The axis button sets latitude, longitude, and spin to multiples of 90°. This usually gives views that are symmetrical-looking. The dice button generates totally random views. Click it as much as you want to see different effects.
|
reset axis dice |

| Frequently Asked Questions
I want to make maps and globes with Flexify. Where can I find suitable input maps? Here are some places to start looking: Virtual Terrain project links to many map sources NASA Jet Propulsion Lab maps of most Solar System bodies Ars Technica earth map Living Earth maps of Earth, Moon , and Mars LunarCell synthetic worlds You can use Flexify's polyhedron modes to make cut-and fold globes.
How do I make a spherical photo without expensive special equipment? Get a plain silver spherical Christmas-tree ornament and photograph it.
How do I improve photos of ornaments? Panoramas made with the mirrored-ball technique always have a flaw at the point opposite the camera. You can either paint this out, or you can photograph the ball twice from two locations about 90° apart around the ball's equator. Unwrap both reflections; their flaws will be in two different places. Use the good part of one image to replace the flaw in the other. Since the reflection in the ball contains the whole scene, the sun or another light source will probably appear in it, and this can cause your camera's auto-exposure to darken the whole picture. To avoid this use a manual exposure setting appropriate for a typical part of the scene. There are other, larger mirrors you can use besides ornaments that will produce better image quality: Gazing balls. These are garden decorations originally popular in Victorian England, and they can be found at some garden-supply stores. Safety/security mirrors. These are the dome-shaped mirrors sometimes seen at busy corridor intersections at airports and warehouses. Hemispherical mirrors from "whole sky cameras." These are hard to find since meteorologists now use fisheye lenses for sky photography. Large steel or copper mixing bowls don't give sharp reflections, but they are inexpensive and can produce soft, tinted views with streaky blurs around the highlights. Using a mirrored ball you can make a wide horizontal view panorama with no flaw. Place the ball on the ground and photograph it from directly above; or hang it from something and shoot it from below. Use a zoom or telephoto lens to get far from the mirror and minimize the size of the camera in the picture. To enable a telephoto lens to focus closer, use it together with
a close-up lens. That this will reduce depth of field, making
focussing trickier.
How do I make a cylindrical QuickTime VR panorama? Make an cylindrical projection, turn it sideways so that the bottom is on the right. Convert it with QTVR Make Panorama 2(Mac) or VRMakePano (Windows). You can find more detailed instructions here.
How do I make a cubic QuickTime VR panorama? Make an equirectangular projection that's exactly twice as wide as it is tall, then drag-and drop it on MakeCubic PPC.
What other panorama viewers are there? Many; click here for a list.
How else can I (ab)use Flexify? Straighten out the horizon in panos shot off-level.
What are some panoramic photo resources on the net? Panoguide.com – info for beginner to semi-pro panoramic photographers Panorama Tools – software to view, create, edit and remap panoramic Images International Association of Panoramic Photographers Panoscan – high-end scanning cameras |
You can place an order online here. A secure server for transactions is available.
Answers to common technical questions appear on the support page, and free upgrades appear periodically on the download page.
Trouble with your order? Orders are handled by Kagi; please contact them at admin@kagi.com .
For bug reports and technical questions about the software, please write to support@flamingpear.com .